반응형
안녕하세요.
이번 포스팅에서는 spinner를 사용해 보겠습니다.
언어: 코틀린
sdk vsersion
- compile: 33
- min: 21
- target: 33
프래그먼트를 하나 생성하여 아래와 같이 작성합니다.
fragment_spinner.xml
<?xml version="1.0" encoding="utf-8"?>
<androidx.constraintlayout.widget.ConstraintLayout xmlns:android="http://schemas.android.com/apk/res/android"
    xmlns:tools="http://schemas.android.com/tools"
    android:layout_width="match_parent"
    android:layout_height="match_parent"
    xmlns:app="http://schemas.android.com/apk/res-auto"
    tools:context=".SpinnerFragment">

    <Spinner
        android:id="@+id/spinner"
        android:layout_width="wrap_content"
        android:layout_height="wrap_content"
        android:background="@color/white"
        app:layout_constraintStart_toStartOf="parent"
        app:layout_constraintTop_toTopOf="parent"
        app:layout_constraintEnd_toEndOf="parent" />

    <TextView
        android:id="@+id/spinner_item"
        android:layout_width="wrap_content"
        android:layout_height="wrap_content"
        app:layout_constraintStart_toStartOf="parent"
        app:layout_constraintTop_toTopOf="parent"
        app:layout_constraintEnd_toEndOf="parent"
        app:layout_constraintBottom_toBottomOf="parent" />

</androidx.constraintlayout.widget.ConstraintLayout>
SpinnerFragment.kt
class SpinnerFragment : Fragment(), AdapterView.OnItemSelectedListener {

    private var _binding: FragmentSpinnerBinding? = null
    private val binding get() = _binding!!

    override fun onCreateView(
        inflater: LayoutInflater, container: ViewGroup?,
        savedInstanceState: Bundle?
    ): View {
        _binding = FragmentSpinnerBinding.inflate(layoutInflater, container, false)
        return binding.root
    }

    override fun onItemSelected(parent: AdapterView<*>?, view: View?, position: Int, id: Long) {
        TODO("Not yet implemented")
    }

    override fun onNothingSelected(parent: AdapterView<*>?) {
        TODO("Not yet implemented")
    }
}
Fragment에서 AdapterView.OnItemSelectedListener interface를 implement 해주고, member들을 override 해줍니다.
그리고 values 아래에 array.xml 파일을 생성해 줍니다(figure1, figure2 참조).
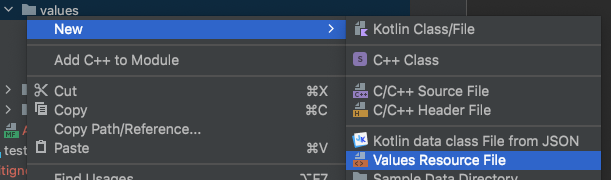
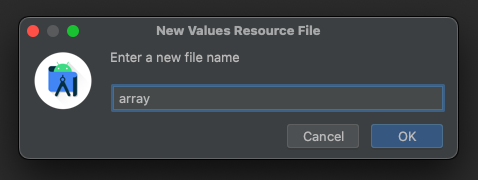
spinner의 item list를 여기에 작성합니다.
array.xml
<?xml version="1.0" encoding="utf-8"?>
<resources>
    <string-array name="pet_list">
        <item>강아지</item>
        <item>고양이</item>
        <item>토끼</item>
        <item>미어캣</item>
        <item>햄스터</item>
    </string-array>
</resources>
프래그먼트에 아래 내용을 추가합니다.
SpinnerFragment.kt
override fun onCreateView(
    inflater: LayoutInflater, container: ViewGroup?,
    savedInstanceState: Bundle?
): View {
    ...
    ArrayAdapter.createFromResource(
        requireContext(),
        R.array.pet_list,
        android.R.layout.simple_spinner_item
    ).also { adapter ->
        adapter.setDropDownViewResource(android.R.layout.simple_spinner_dropdown_item)
        binding.spinner.adapter = adapter
    }
    binding.spinner.onItemSelectedListener = this
    ...
}
override 된 함수들은 아래와 같이 작성해 줍니다.
SpinnerFragment.kt
override fun onItemSelected(parent: AdapterView<*>?, view: View?, position: Int, id: Long) {
    if (parent != null) {
        binding.spinnerItem.text = parent.getItemAtPosition(position).toString()
    }
}

override fun onNothingSelected(parent: AdapterView<*>?) {
    binding.spinnerItem.text = "nothing"
}
선택된 아이템이 가운데 TextView에 표시되고, 선택된 아이템이 없을 경우 nothing이 표시됩니다.
테스트 돌려보겠습니다.
정상적으로 동작합니다.
이상 포스팅을 마치겠습니다.
감사합니다.
반응형
'Android Application > 기초 사용법' 카테고리의 다른 글
| 안드로이드 네비게이션 사용 시 데이터 넘기기(navigation argument) (1) | 2023.04.05 |
|---|---|
| 안드로이드 프로그레스 바(progress bar) 사용하기(with timer) (0) | 2023.04.04 |
| 안드로이드 retrofit2 사용(with Coroutine) - 로또 api 요청 (0) | 2023.04.02 |
| 안드로이드 이벤트버스(EventBus) 사용 (1) | 2023.04.02 |
| 안드로이드 ML Kit - QR scan 구현 (0) | 2023.04.01 |