안녕하세요.
이번 포스팅에서는 coroutine과 retrofit2를 심플하게 사용하여 회차별 로또 정보를 받아와 보겠습니다.
언어: 코틀린
sdk vsersion
- compile: 33
- min: 21
- target: 33
dependency를 추가합니다.
build.gradle(:app)
dependencies {
    ...
    implementation 'com.squareup.retrofit2:converter-moshi:2.9.0'
    ...
}
Fragment를 생성해 줍니다.
fragment_lotto.xml
<?xml version="1.0" encoding="utf-8"?>
<FrameLayout xmlns:android="http://schemas.android.com/apk/res/android"
    xmlns:tools="http://schemas.android.com/tools"
    android:layout_width="match_parent"
    android:layout_height="match_parent"
    tools:context=".LottoFragment">

    <TextView
        android:layout_width="match_parent"
        android:layout_height="match_parent"
        android:text="Hello" />

</FrameLayout>
LottoFragment.kt
class LottoFragment : Fragment() {

    private var _binding: FragmentLottoBinding? = null
    private val binding get() = _binding!!

    override fun onCreateView(
        inflater: LayoutInflater, container: ViewGroup?,
        savedInstanceState: Bundle?
    ): View {
        _binding = FragmentLottoBinding.inflate(layoutInflater, container, false)
        return binding.root
    }
}
포스팅에서 사용할 API는 아래와 같이 되어있습니다.
https://www.dhlottery.co.kr/common.do/?method=getLottoNumber&drwNo=1
drwNo 뒤에 숫자를 대입하여 해당 회차의 정보를 가져올 수 있습니다.
이를 구글의 주소창에 입력하면 아래와 같은 결과가 나옵니다.
{"totSellamnt":3681782000,"returnValue":"success","drwNoDate":"2002-12-07","firstWinamnt":0,"drwtNo6":40,"drwtNo4":33,"firstPrzwnerCo":0,"drwtNo5":37,"bnusNo":16,"firstAccumamnt":863604600,"drwNo":1,"drwtNo2":23,"drwtNo3":29,"drwtNo1":10}
이를 이용하여 데이터 클래스를 생성하겠습니다.
Kotlin data class File from JSON을 사용하면 간편하게 생성할 수 있습니다.
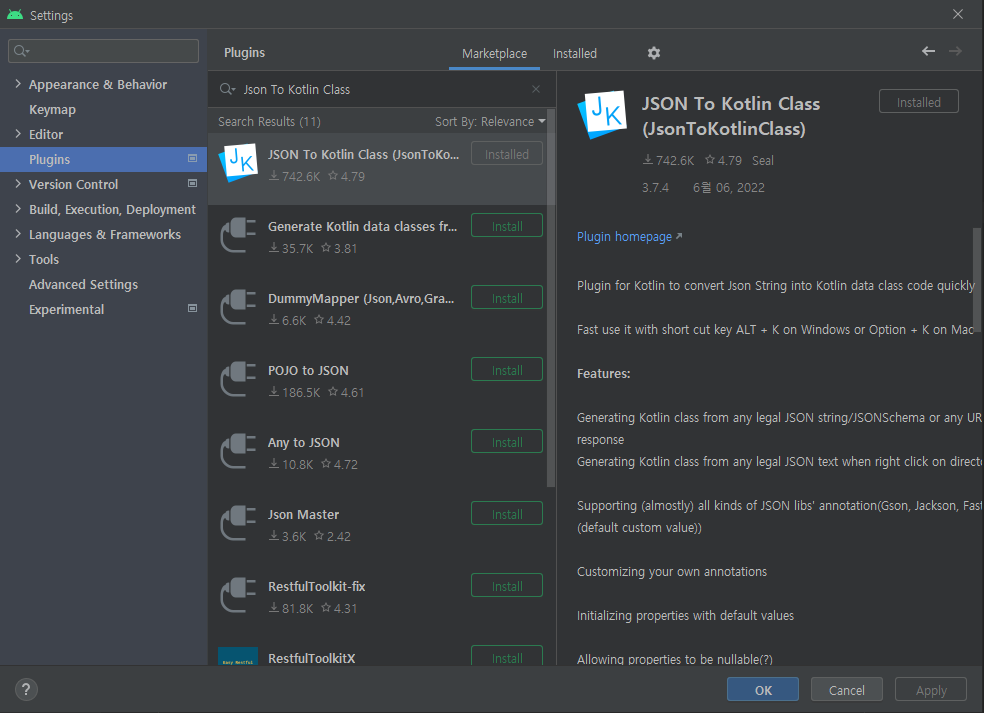
해당 플러그인이 없으신 분은 File > Settings > Plugins > 'Json To Kotlin Class' 검색하여 설치해야 합니다(figure1 참조).
New > Kotlin data class File from JSON 옵션을 선택합니다(figure2 참조).

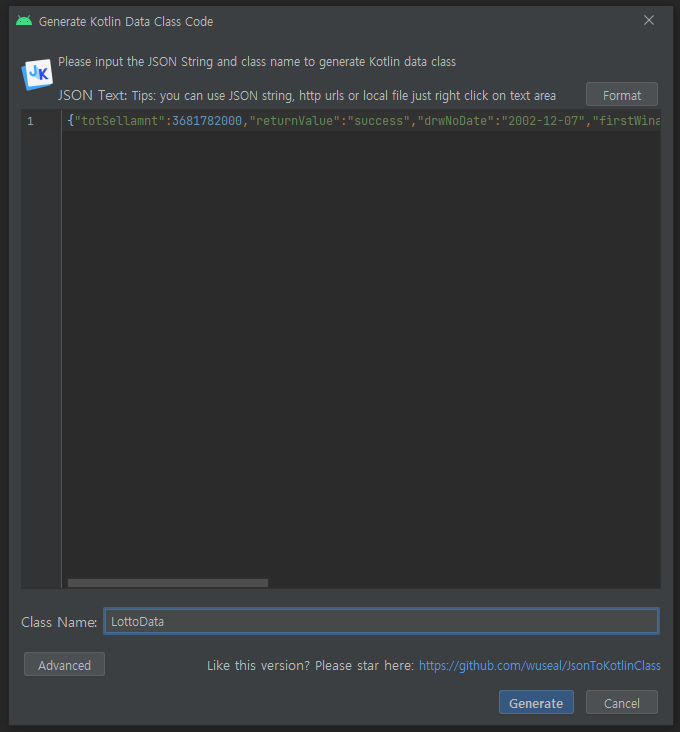
구글 검색창에 입력해서 나온 결과를 복사 / 붙여 넣고 클래스명을 입력해 줍니다(figure3 참조).
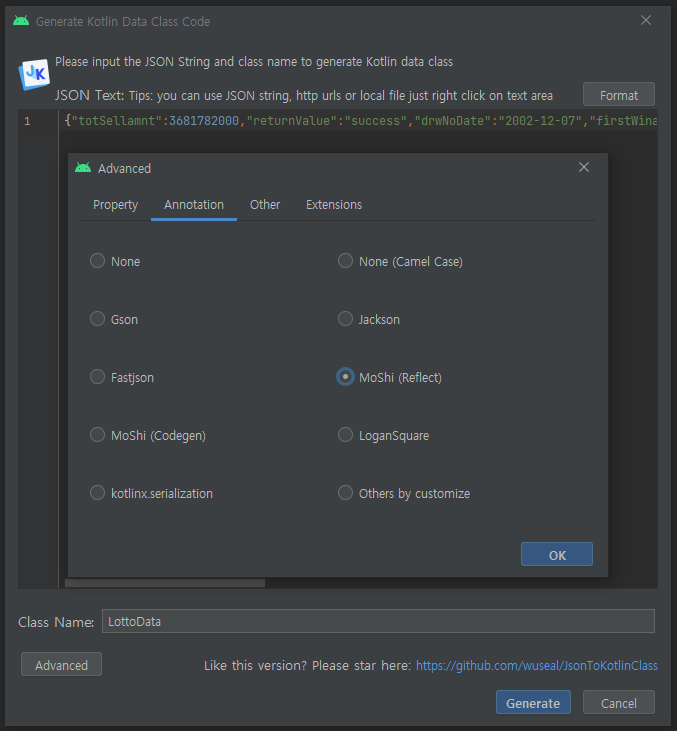
저는 다른 건 건드리지 않고 Advanced > Annotation > Moshi (Reflect)만 선택해 주고 생성하였습니다(figure4 참조).
데이터 클래스가 아래와 같이 생성됩니다.
LottoData.kt
data class LottoData(
    @Json(name = "bnusNo")
    val bnusNo: Int?,
    @Json(name = "drwNo")
    val drwNo: Int?,
    @Json(name = "drwNoDate")
    val drwNoDate: String?,
    @Json(name = "drwtNo1")
    val drwtNo1: Int?,
    @Json(name = "drwtNo2")
    val drwtNo2: Int?,
    @Json(name = "drwtNo3")
    val drwtNo3: Int?,
    @Json(name = "drwtNo4")
    val drwtNo4: Int?,
    @Json(name = "drwtNo5")
    val drwtNo5: Int?,
    @Json(name = "drwtNo6")
    val drwtNo6: Int?,
    @Json(name = "firstAccumamnt")
    val firstAccumamnt: Long?,
    @Json(name = "firstPrzwnerCo")
    val firstPrzwnerCo: Int?,
    @Json(name = "firstWinamnt")
    val firstWinamnt: Long?,
    @Json(name = "returnValue")
    val returnValue: String?,
    @Json(name = "totSellamnt")
    val totSellamnt: Long?
)
firstAccumamnt와 firstWinamnt는 처음에 Int로 정의될 수 있습니다. 이 둘은 수가 커서 Int로는 에러가 날수 있으니 Long으로 수정합니다.
http 통신을 위한 Service Interface를 생성합니다.
LottoService.kt
interface LottoService {
    @GET("common.do")
    suspend fun getDrawingResult(
        @Query("method") method: String,
        @Query("drwNo") drwNo: String,
    ): LottoData
}
프래그먼트를 아래와 같이 작성합니다.
LottoFragment.kt
class LottoFragment : Fragment() {

    private var _binding: FragmentLottoBinding? = null
    private val binding get() = _binding!!

    override fun onCreateView(
        inflater: LayoutInflater, container: ViewGroup?,
        savedInstanceState: Bundle?
    ): View {
        Log.d("LottoFragment", "onCreateView")
        _binding = FragmentLottoBinding.inflate(layoutInflater, container, false)

        CoroutineScope(Dispatchers.IO).launch {
            Log.d("LottoFragment", "result : ${getDrawingResult()}")
        }
        return binding.root
    }

    private fun getLottoService(): LottoService {
        Log.d("LottoFragment", "getLottoService")
        return Retrofit.Builder()
            .client(OkHttpClient.Builder().build())
            .baseUrl("https://www.dhlottery.co.kr/")
            .addConverterFactory(
                MoshiConverterFactory.create()
            )
            .build()
            .create(LottoService::class.java)
    }

    private suspend fun getDrawingResult(): LottoData {
        Log.d("LottoFragment", "getDrawingResult")
        return getLottoService().getDrawingResult(method = "getLottoNumber", drwNo = "1")
    }
}
※서버와 통신하는 getDrawingResult는 suspend function이기 때문에 couroutine 혹은 다른 suspend function에서만 호출될 수 있습니다.
아래와 같이 coroutine을 사용해 호출합니다.
LottoFragment.kt > onCreateView
CoroutineScope(Dispatchers.IO).launch {
    Log.d("LottoFragment", "result : ${getDrawingResult()}")
}
Coroutine과 retrofit을 사용하여 로또 정보를 요청하고, 응답받은 데이터를 로그로 찍어보았습니다(figure5 참조).

figure5에 찍힌 결과는 아래와 같습니다.
2023-04-02 17:40:47.194 17609-17609/com.example.laboratory D/LottoFragment: onCreateView
2023-04-02 17:40:47.236 17609-17644/com.example.laboratory D/LottoFragment: getDrawingResult
2023-04-02 17:40:47.236 17609-17644/com.example.laboratory D/LottoFragment: getLottoService
2023-04-02 17:40:48.418 17609-17644/com.example.laboratory D/LottoFragment: result : LottoData(bnusNo=16, drwNo=1, drwNoDate=2002-12-07, drwtNo1=10, drwtNo2=23, drwtNo3=29, drwtNo4=33, drwtNo5=37, drwtNo6=40, firstAccumamnt=863604600, firstPrzwnerCo=0, firstWinamnt=0, returnValue=success, totSellamnt=3681782000)
정상적으로 받아옵니다.
이상 포스팅을 마치겠습니다.
감사합니다.
'Android Application > 기초 사용법' 카테고리의 다른 글
| 안드로이드 프로그레스 바(progress bar) 사용하기(with timer) (0) | 2023.04.04 |
|---|---|
| 안드로이드 스피너(spinner) 사용 (0) | 2023.04.03 |
| 안드로이드 이벤트버스(EventBus) 사용 (0) | 2023.04.02 |
| 안드로이드 ML Kit - QR scan 구현 (0) | 2023.04.01 |
| 안드로이드 힐트(hilt) 의존성 주입 사용 (1) | 2023.03.31 |