안녕하세요.
이번 포스팅에서는 네비게이션으로 프래그먼트 이동 시 데이터를 넘겨주는 소스를 구현해 보겠습니다.
언어: 코틀린
sdk vsersion
- compile: 33
- min: 21
- target: 33
아래 포스팅에서 구현된 소스에 추가 작업을 해주겠습니다.
https://it-of-fortune.tistory.com/24
안드로이드 네비게이션(navigation) 사용
안녕하세요. 이번 포스팅에서는 기본적인 안드로이드 네비게이션을 구현해 보겠습니다. dependency를 추가합니다. build.gradle(project) buildscript { ext { nav_version = '2.5.3' } dependencies { classpath "androidx.naviga
it-of-fortune.tistory.com
데이터 클래스를 전달하기 위해 parcelize를 사용합니다.
app level의 build.gradle에 아래 코드를 추가한 뒤 gradle sync를 해줍니다.
build.gradle(:app)
plugins {
    ...
    id 'kotlin-parcelize'
    ...
}
이후, 인자로 넘기기 위한 데이터 클래스를 작성하겠습니다.
아래와 같이 @Parcelize annotaion을 붙여 작성해 줍니다.
SampleArgumentData.kt
@Parcelize
data class SampleArgumentData(
    val sampleString: String,
    val sampleInteger: Int
) : Parcelable
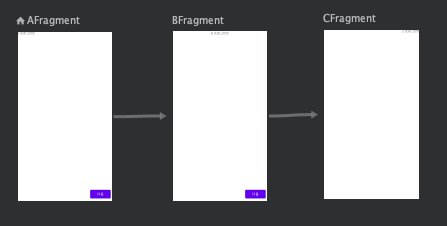
현재 작성된 nav_main.xml은 아래와 같습니다(figure1 참조).
nav_main.xml(code)
<?xml version="1.0" encoding="utf-8"?>
<navigation xmlns:android="http://schemas.android.com/apk/res/android"
    xmlns:app="http://schemas.android.com/apk/res-auto"
    xmlns:tools="http://schemas.android.com/tools"
    android:id="@+id/nav_main"
    app:startDestination="@id/AFragment">
    <fragment
        android:id="@+id/AFragment"
        android:name="com.contents.laboratory.fragments.AFragment"
        android:label="fragment_a"
        tools:layout="@layout/fragment_a" >
        <action
            android:id="@+id/action_AFragment_to_BFragment"
            app:destination="@id/BFragment" />
    </fragment>
    <fragment
        android:id="@+id/BFragment"
        android:name="com.contents.laboratory.fragments.BFragment"
        android:label="fragment_b"
        tools:layout="@layout/fragment_b" >
        <action
            android:id="@+id/action_BFragment_to_CFragment"
            app:destination="@id/CFragment" />
    </fragment>
    <fragment
        android:id="@+id/CFragment"
        android:name="com.contents.laboratory.fragments.CFragment"
        android:label="fragment_c"
        tools:layout="@layout/fragment_c" />
</navigation>
design tab에서 데이터를 전달받을 프래그먼트를 클릭한 뒤 오른쪽 Attributes 창에서 Arguments +를 눌러줍니다(figure2 참조).
Add Argument 팝업 창에서 Custom Parcelable을 선택해 주면 Parcelize data class 목록이 나옵니다(figure3, figure4 참조).
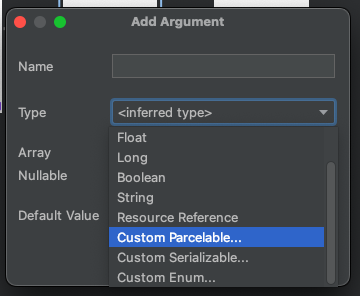
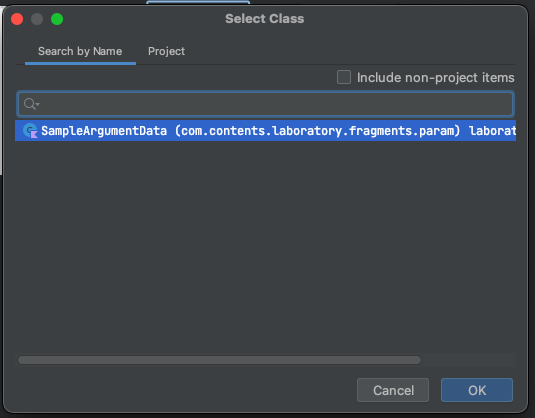
여기서 필요한 데이터 클래스를 선택한 뒤 OK 버튼을 클릭, Name을 정하고 Add 버튼을 눌러줍니다.
저는 sampleArgument라고 이름 지었습니다.
※위 과정에서 전달해야 할 데이터가 클래스의 형태가 아닌 Int, String, Boolean 등의 타입이라면 처음에 추가한 parcelize는 필요하지 않습니다.
이제 code 쪽을 보면, argument가 추가된 fragment의 태그에 <argument> 태그가 추가된 것을 확인할 수 있습니다.
nav_main.xml(code)
...
<fragment
android:id="@+id/BFragment"
android:name="com.contents.laboratory.fragments.BFragment"
android:label="fragment_b"
tools:layout="@layout/fragment_b" >
<action
    android:id="@+id/action_BFragment_to_CFragment"
    app:destination="@id/CFragment" />
<argument
    android:name="sampleArgument"
    app:argType="com.contents.laboratory.fragments.param.SampleArgumentData" />
</fragment>
...
현재 navigation direction이 AFragment -> Bfragment로 되어있으니, AFragment에서 데이터를 전달하는 코드를 작성하겠습니다.
navigate 진행 시 아래와 같이 SampleArgumentData를 넘겨주면 됩니다.
아래의 예문에는 생성과 동시에 넘겨지도록 되어있습니다.
AFragment.kt
AFragmentDirections.actionAFragmentToBFragment(
    SampleArgumentData(
        sampleString = "Sample",
        sampleInteger = 777
    )
)
AFragment 전체 소스입니다.
AFragment.kt
class AFragment : Fragment() {

    private var _binding: FragmentABinding? = null
    private val binding get() = _binding!!

    override fun onCreateView(
        inflater: LayoutInflater, container: ViewGroup?,
        savedInstanceState: Bundle?
    ): View {
        _binding = FragmentABinding.inflate(layoutInflater, container, false)
        binding.moveNext.setOnClickListener {
            navigateToBFragment()
        }
        return binding.root
    }

    private fun navigateToBFragment() {
        this@AFragment.findNavController().navigate(
            AFragmentDirections.actionAFragmentToBFragment(
                SampleArgumentData(
                    sampleString = "Sample",
                    sampleInteger = 777
                )
            )
        )
    }

    override fun onDestroyView() {
        super.onDestroyView()
        _binding = null
    }
}
BFragment에서 데이터를 받아 text로 표시해 주는 코드를 작성하겠습니다.
fragment_b.xml
<?xml version="1.0" encoding="utf-8"?>
<androidx.constraintlayout.widget.ConstraintLayout xmlns:android="http://schemas.android.com/apk/res/android"
    xmlns:tools="http://schemas.android.com/tools"
    android:layout_width="match_parent"
    android:layout_height="match_parent"
    xmlns:app="http://schemas.android.com/apk/res-auto"
    tools:context=".fragments.BFragment">

    <TextView
        android:layout_width="wrap_content"
        android:layout_height="wrap_content"
        android:text="B 프래그먼트"
        app:layout_constraintTop_toTopOf="parent"
        app:layout_constraintStart_toStartOf="parent"
        app:layout_constraintEnd_toEndOf="parent"/>

    <TextView
        android:id="@+id/argument_string"
        android:layout_width="wrap_content"
        android:layout_height="wrap_content"
        app:layout_constraintTop_toTopOf="parent"
        app:layout_constraintBottom_toBottomOf="parent"
        app:layout_constraintStart_toStartOf="parent"
        app:layout_constraintEnd_toEndOf="parent"/>

    <TextView
        android:id="@+id/argument_integer"
        android:layout_width="wrap_content"
        android:layout_height="wrap_content"
        app:layout_constraintTop_toBottomOf="@id/argument_string"
        app:layout_constraintStart_toStartOf="parent"
        app:layout_constraintEnd_toEndOf="parent"/>

    <Button
        android:id="@+id/move_next"
        android:layout_width="wrap_content"
        android:layout_height="wrap_content"
        android:layout_margin="10dp"
        android:text="다음"
        app:layout_constraintEnd_toEndOf="parent"
        app:layout_constraintBottom_toBottomOf="parent"/>

</androidx.constraintlayout.widget.ConstraintLayout>
아래 코드가 argument를 전달받는 코드입니다. 이를 BFragment에 추가해 줍니다.
BFragment.kt
private val args: BFragmentArgs by navArgs()그리고 args에서 데이터를 꺼내 textView로 표시해 주는 코드를 작성합니다.
BFragment.kt
override fun onCreateView(
    inflater: LayoutInflater, container: ViewGroup?,
    savedInstanceState: Bundle?
): View {
    _binding = FragmentBBinding.inflate(layoutInflater, container, false)
    binding.moveNext.setOnClickListener {
        navigateToCFragment()
    }
    binding.argumentString.text = args.sampleArgument.sampleString
    binding.argumentInteger.text = args.sampleArgument.sampleInteger.toString()
    return binding.root
}
BFragment 전체 소스입니다.
BFragment.kt
class BFragment : Fragment() {

    private var _binding: FragmentBBinding? = null
    private val binding get() = _binding!!

    private val args: BFragmentArgs by navArgs()

    override fun onCreateView(
        inflater: LayoutInflater, container: ViewGroup?,
        savedInstanceState: Bundle?
    ): View {
        _binding = FragmentBBinding.inflate(layoutInflater, container, false)
        binding.moveNext.setOnClickListener {
            navigateToCFragment()
        }
        binding.argumentString.text = args.sampleArgument.sampleString
        binding.argumentInteger.text = args.sampleArgument.sampleInteger.toString()
        return binding.root
    }

    private fun navigateToCFragment() {
        this@BFragment.findNavController().navigate(
            BFragmentDirections.actionBFragmentToCFragment()
        )
    }

    override fun onDestroyView() {
        super.onDestroyView()
        _binding = null
    }
}
에뮬레이터에서 실행해 보겠습니다.
잘 전달되어 text가 표시됩니다.
이상 포스팅을 마치겠습니다.
감사합니다.
'Android Application > 기초 사용법' 카테고리의 다른 글
| 안드로이드 컴포즈 원형 프로그레스 (Jetpack Compose CircularProgressIndicator) (0) | 2023.06.10 |
|---|---|
| 안드로이드 Firebase Cloud Firestore database 생성, 연동, 사용법 (0) | 2023.04.06 |
| 안드로이드 프로그레스 바(progress bar) 사용하기(with timer) (0) | 2023.04.04 |
| 안드로이드 스피너(spinner) 사용 (0) | 2023.04.03 |
| 안드로이드 retrofit2 사용(with Coroutine) - 로또 api 요청 (0) | 2023.04.02 |