안녕하세요.
이번 포스팅에서는 저번 포스팅에서 사용했던 프래그먼트와 뷰모델을 이용해 데이터바인딩을 구현해 보도록 하겠습니다.
아래 링크에서 이전에 구현한 내용을 참고해 주세요. 새로 프래그먼트를 생성하셔도 문제없습니다.
https://it-of-fortune.tistory.com/22
안드로이드 뷰모델(ViewModel) 사용하기(with LiveData)
안녕하세요. 이번 포스팅에서는 프래그먼트에서 뷰모델과 라이브 데이터를 사용해 보겠습니다. 언어: 코틀린 sdk vsersion - compile: 33 - min: 21 - target: 33 우선 프래그먼트를 하나 생성하겠습니다. Frag
it-of-fortune.tistory.com
언어: 코틀린
sdk vsersion
- compile: 33
- min: 21
- target: 33
먼저 dataBinding 사용을 위해 아래와 같이 build.gradle에 한 줄을 추가합니다.
build.gradle(:app)
android {
   ...
    buildFeatures {
        ...
        dataBinding true
        ...
    }
    ...
}
다음으로, 프래그먼트의 layout xml에서 가장 바깥의 view를 클릭하고 Alt + enter를 입력하면 data binding layout으로 convert 해주는 옵션이 나옵니다(figure1 참조).

여기서 Convert to data binding layout을 선택하면 xml이 알아서 수정됩니다(figure2 참조).

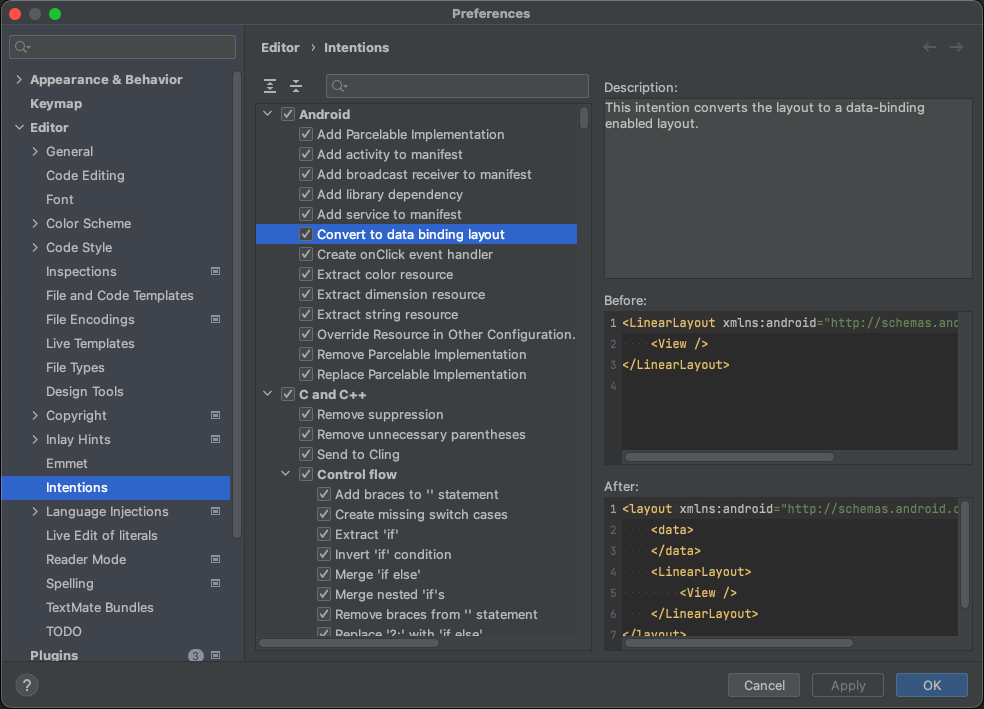
※ Alt + enter를 입력했는데 Convert to data binding layout 선택지가 안 나오는 분들이 계실 수 있습니다.
Settings > Editor > Intentions에서 Convert to data binding layout에 체크가 되어있는지 확인해 주세요(figure3 참조).
이제 본격적으로 데이터바인딩을 적용해 보겠습니다.
layout xml의 data tag에 아래 내용을 추가합니다.
fragment_practice.xml
<data>

    <variable
        name="viewModel"
        type="com.contents.laboratory.PracticeViewModel" />

</data>
이로써, xml에서 viewModel 사용이 가능해졌습니다.
xml을 아래와 작성해 줍니다.
fragment_practice.xml
<?xml version="1.0" encoding="utf-8"?>
<layout xmlns:android="http://schemas.android.com/apk/res/android"
    xmlns:tools="http://schemas.android.com/tools"
    xmlns:app="http://schemas.android.com/apk/res-auto">

    <data>

        <variable
            name="viewModel"
            type="com.contents.laboratory.PracticeViewModel" />

    </data>

    <androidx.constraintlayout.widget.ConstraintLayout
        android:layout_width="match_parent"
        android:layout_height="match_parent"
        tools:context=".PracticeFragment">

        <TextView
            android:id="@+id/test_text"
            android:layout_width="wrap_content"
            android:layout_height="wrap_content"
            android:text="@{viewModel.testNumber.toString()}"
            app:layout_constraintBottom_toBottomOf="parent"
            app:layout_constraintEnd_toEndOf="parent"
            app:layout_constraintStart_toStartOf="parent"
            app:layout_constraintTop_toTopOf="parent" />

        <Button
            android:id="@+id/button"
            android:layout_width="wrap_content"
            android:layout_height="wrap_content"
            android:text="버튼"
            app:layout_constraintEnd_toEndOf="parent"
            app:layout_constraintStart_toStartOf="parent"
            app:layout_constraintTop_toTopOf="parent" />

    </androidx.constraintlayout.widget.ConstraintLayout>
</layout>
텍스트뷰와 버튼뷰에 바인딩이 되는 부분이 추가되었습니다.
TextView
android:text="@{viewModel.testNumber.toString()}"Button
android:onClick="@{() -> viewModel.onButtonClicked()}"
다음으로 프래그먼트에서 뷰를 참조하던 코드와 뷰모델의 함수를 호출하던 코드를 지워준 뒤 xml에 자신의 뷰모델과 라이프 사이클 오너를 알려주는 코드를 추가합니다.
아래와 같이 수정되었습니다.
PracticeFragment.kt
class PracticeFragment : Fragment() {

    companion object {
        fun newInstance() = PracticeFragment()
    }

    private var _binding: FragmentPracticeBinding? = null
    private val binding get() = _binding!!

    private lateinit var viewModel: PracticeViewModel

    override fun onCreateView(
        inflater: LayoutInflater, container: ViewGroup?,
        savedInstanceState: Bundle?
    ): View {
        _binding = FragmentPracticeBinding.inflate(layoutInflater, container, false)
        return binding.root
    }

    override fun onActivityCreated(savedInstanceState: Bundle?) {
        super.onActivityCreated(savedInstanceState)
        viewModel = ViewModelProvider(this)[PracticeViewModel::class.java]
        binding.viewModel = this@PracticeFragment.viewModel
        binding.lifecycleOwner = viewLifecycleOwner
    }

    override fun onDestroyView() {
        super.onDestroyView()
        _binding = null
    }
}
binding.viewModel = this@PracticeFragment.viewModel
binding.lifecycleOwner = viewLifecycleOwner
위의 두 줄을 확인해 주세요.
전과 마찬가지로, 구현한 동작은 버튼 클릭 시 숫자가 1씩 더해져 화면에 출력되는 내용입니다.
에뮬레이터에서 실행해 보겠습니다.

정확하게 같은 동작을 합니다.
훌륭하게 refactoring 되었습니다.
이상 포스팅을 마칩니다.
감사합니다.
'Android Application > 기초 사용법' 카테고리의 다른 글
| 안드로이드 리사이클러뷰(recyclerview) 사용(with DiffUtil) (0) | 2023.03.30 |
|---|---|
| 안드로이드 네비게이션(navigation) 사용 (0) | 2023.03.30 |
| 안드로이드 뷰모델(ViewModel) 사용하기(with LiveData) (0) | 2023.03.28 |
| 안드로이드 ViewBinding(뷰바인딩) 구현 (0) | 2023.03.26 |
| 안드로이드 - Navigation(with bottom tab) 구현 (0) | 2023.03.25 |